My Patreon page includes links to several other projects I have been working on. Check it out!
Happy New Year from an Arduino!
I’ve published an Instructable that shows how to generate super fast analog voltages on an Arduino. Watch the whole video for a very special New Years message!
To find out how I did this, head over to https://www.instructables.com/id/Super-Fast-Analog-Voltages-From-Arduino/
R.I.P. Macintosh PowerBook 3400c (1997-2017)

Wikipedia, Neale Monks
Yesterday my Apple Macintosh PowerBook 3400c died.
This happened just after I had loaded MacOS 8.6 on a 80x 2GB CompactFlash card I got off eBay. My hope was that a solid state boot drive would insure against future mechanical hard drive failures, something I often worry about with my vintage computers. In a cruel yet comical twist of faith, the very act that I hoped to preserve it seems to have killed it.
Mr. Murphy, you never fail to surprise!
360° Panoramas of In-Game Graphics from “Titanic: Honor & Glory”
Recently I have had the opportunity to try out third demo of “Titanic: Honor & Glory”, a gorgeous game under development by Vintage Digital Revival that recreates the historic ocean liner in stunning detail and realism.
I captured some 360° panoramas from the demo that show you just how realistic and gorgeous the graphics are. Here is a black and white panorama of the first class dining room:

And here is an exterior shot, showing the Titanic in its dock:

I highly recommend you try out the demo yourself. If you would like to create your own panoramas, I have made a YouTube video to document the process. The process should work for any game with a first person vantage point.
The following software was used in the video tutorial:
- Titanic: Honor & Glory Demo 3 (free)
- Image Composite Editor (free)
- Exif Fixer (shareware)
Advanced Tip: The method can also be extended to create equirectangular images, such as this:
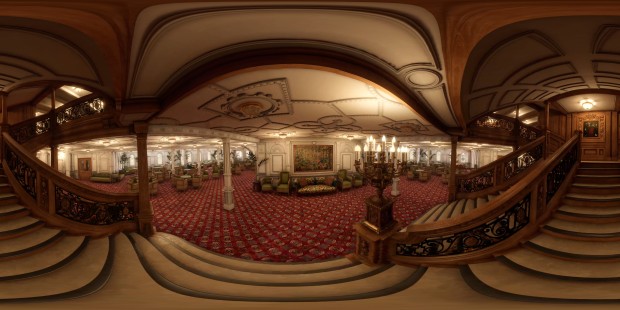
The only modification to the technique described in the video is that the in-game footage is captured by sweeping from top to bottom while rotating in a spiral pattern.
The Journey and Technology Behind “Maze War VR”
![]()
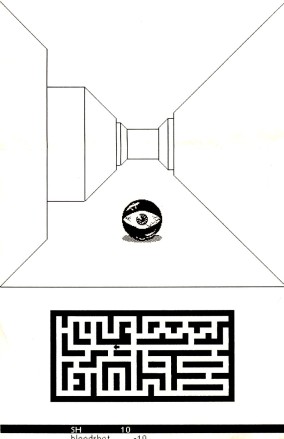
I have been working on a game that bridges the new to the old. Maze War is a historic game: it was the very first first person shooter game, released in 1974 for a computer called the Imlac.
Maze War VR is a web game. On the surface, it is an simple web game with a retro feel, but how the first led to the second is a story of how one hack led to another, and then to another, and to many others still.
It Started with a Museum
I have a sweet spot in my heart for retro computers and software. I built an online computer museum, in JavaScript, so that people could interact with vintage computers and learn about them. This is the altruistic reason I share with others: in truth, the project was a selfish excuse for me to spend time tinkering with emulators, old software and Javascript, three things I really enjoy.
Some of the features in my museum stem from a desire to leave no “what if” unexplored. For instance: I made it so the emulated computers could talk to one another, via an emulated serial connection, from one browser window to another. This entailed a series of sub-hacks, including code to emulate a Hayes smart-modem and a virtual telephone exchange complete with made up telephone numbers in the ficticious 555 area code, which would allow one emulated computers to “dial” another via WebRTC data-channels.
One of my early experiments involved running two instances of Battlechess, one on an emulated Macintosh and another on an emulated Commodora Amiga 500 in different browser tabs. Using my emulated modem, I was able to send a move across the line, but not quite reliably enough for a playable game (perhaps Battlechess required serial flow control, which my code did not implement).
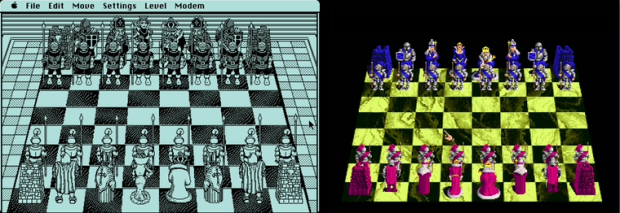
Battlechess on the Macintosh (left), Battlechess on the Amiga 500 (right)
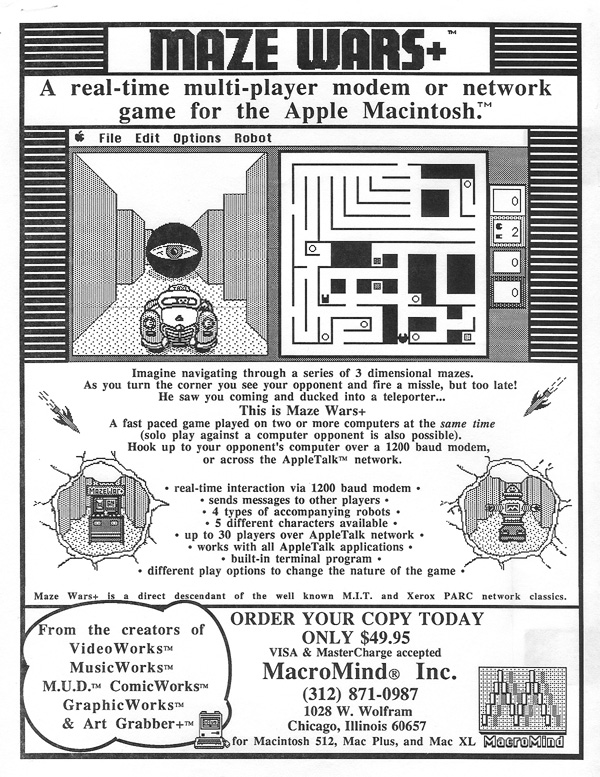
MazeWars+ between two emulated Macintosh instances, however, worked perfectly, proving the concept and leading me to want even more than two simultaneous players.
From Emulated Modems to LocalTalk
Having gotten a pair of computers to play Maze Wars+ via a serial link, I set my sights on allowing several to do so. Most of the computers in my museum lacked native networking capabilities, but the Apple Macintosh Plus, the crown jewel of my museum, had in its original form the ability to participate in a LAN called a LocalTalk network. With LocalTalk, Maze Wars+ on the Macintosh supported up to thirty simultaneous players. Thirty is a whole lot better than two.
The Macintosh had a Mini DIN-9 port on its rear called the LocalTalk port. This port served double-duty: it could serve as a serial port or as an interface to the LocalTalk network, via Y-splitters. At minimum, two Macintosh computers could be cabled directly together via their LocalTalk ports, making a small LAN of two, but more often, several computers were daisy chained together into a larger network.
This simplicity lead me to believe that LocalTalk was plain old serial communications, with the transmit and receive lines electrically coupled into a common wire. I suspected that expanding my serial port demo to a LAN would merely involve shuttling serial data from one emulated Macintosh to several others, a trivial modification from sending it to just one, which I had already demonstrated. Easy peasy.
The Zilog E8530 SCC
It turns out I was wrong. The Macintosh uses a chip called the Zilog E8530 SCC, a master-of-all-trades. Yes, it does serial communications, but it also has a much more complex mode called SDLC that forms the backbone of the LocalTalk network. In this mode, the chip is quite sophisticated. It frames packets, senses the media, avoids and detects collisions and computes frame checksums.
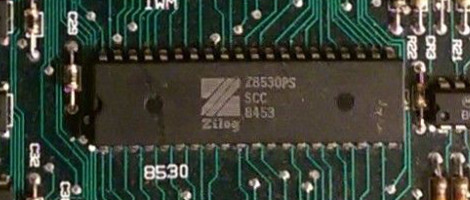
The Z8530 SCC chip on on an Apple Macintosh 128K/512K motherboard
The PCE emulator I had been using implemented the serial mode of the Zilog chip, but not the SDLC mode. This task would fall to me. Fortunately, I was able to rely on the earlier work that had been done by Mike Fort for the Mini vMac emulator. Even with that source as my guide and the comprehensive “Zilog SCC/ESCC User Manual”, adding SDLC capabilities to the PCE emulator turned out to be a significant undertaking.
The reward came when I combined this with my earlier WebRTC work to allow several emulated Macintosh computers to communicate using native AppleTalk frames on a simulated inter-browser network.
Today, my museum features several multi-player Macintosh games, such as NetTrek, Pararena, and Maze War+.
The Xerox Alto: The Missing Link
 My success in making Maze War+, a Macintosh game, playable in LAN mode in my museum lead me to the next step: a step forward but also back in history. The Xerox Alto, a computer developed at the Xerox PARC Labs in the 1970s, is an important player in the history of the Macintosh: it inspired Steve Jobs and his team to develop the Macintosh GUI.
Not only did the Xerox Alto play this pivotal role to the Macintosh, it also ran a much earlier version of Maze War, which had been developed at MIT around 1976. The more I learned, the more I understood that the Xerox Alto could weave together two threads in my museum: the story of the Macintosh as well as the story of Maze War, the game.
At this point, it became inevitable that my museum had to one day have a Xerox Alto running Maze War, in multi-player mode.
The Xerox Alto, in JavaScript.
So inspired in this new mission, I came across an emulator called SALTO and ported it to JavaScript using the EMSCRIPTEN toolchain. Sadly, I found that it was too buggy and slow to be of use.
Further research led me to another emulator, Contralto, that was being developed by the Living Computers: Museum+Labs. This emulator proved to be much more robust, but was written in C#, making my plans of using EMSCRIPTEN to port it to Javascript impossible. Porting it by hand appeared daunting, but another brave individual had already taken up the challenge.
I got in touch with the author of ContraltoJS, a JavaScript port of Contalto, and began collaborating with him. The Ethernet emulation was something the author of ContraltoJS had not yet tackled, so I volunteered to help, hoping that my earlier work with PCE and SDLC would give me the right experience for the job. This turned out to be true and my earlier AppleTalk tunneling code morphed into a general library for tunneling legacy protocols over WebRTC: now capable of both LocalTalk and the legacy Ethernet frames that the Xerox Alto employed.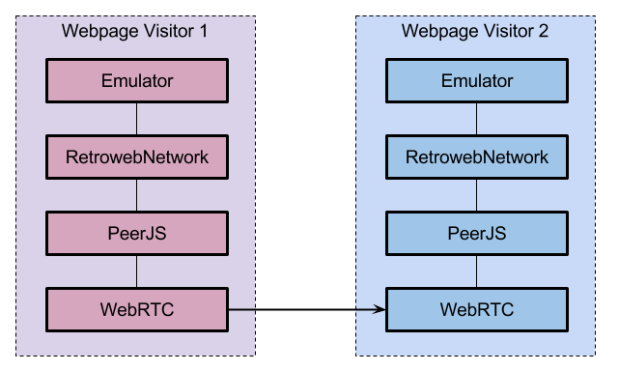
I eventually demonstrated instances of ContraltoJS running in a LAN in the web browser, playing two multi-player games for the Xerox Alto: Battleship and Maze War.
Rethinking Maze War, in the Third Dimension
Along side my work with emulators, I had been learning THREE.js, a 3D graphics library for the web. It occurred to me one night that making a Maze War clone would be a excellent learning experience. Drawing mazes and spheres is fairly straightforward in THREE.js, after all.
Doing a remake of Maze War did not take me deep enough into the rabbit hole, however,so I decided my version would have to be compatible with the Xerox Alto version. This goal led me to reverse-engineer the legacy Ethernet frames of the original game as it ran under ContraltoJS. These packets were being wrapped and tunneled over WebRTC, so I ended up writing a packet inspection tool for my tunneling library.
The work of understanding the Maze War frames was aided by documentation on the PUP data frames used by the Xerox Alto as well as by code fragments from the original Maze War that were graciously provided to me by the developer of ContraltoJS.
The Last Frontier: Virtual Reality
The last step on this journey was rewriting the game to WebVR specs and Gamepad API. By using Crosswalk, I was able to bring it to mobile phone users. Maze War VR is now available both on the Android store as well as online for all major VR headsets. It has been tested on Google Cardboard, GearVR, Oculus Rift, but should work on any WebVR capable browser. Give it a try. Invite your friends to step right into this historic game with you.
Oh, and don’t forget it is also compatible with Maze War for the Xerox Alto.
Legacy Peer-to-Peer Networking over WebRTC (Introduction)
 One of my long term ambitions for the RetroWeb Vintage Computer Museum was to allow the emulated computers to talk to one another. Last July, after learning about WebRTC and PeerJS, I managed to accomplish first contact. By tunneling serial data over WebRTC, I had an emulated Macintosh running one browser window playing BattleChess with an emulated Commodore Amiga running on another browser window; I then played MazeWars+ with a stranger I met on the MAME IRC channel, showing that playing games originally meant for modem play via the Internet instead, through WebRTC, was not only possible, but also rather fun!
By August, I had become determined to tunnel AppleTalk packets over WebRTC, which would allow MazeWars+ and other multi-player Macintosh games to be played with several players at once. In subsequent posts of this series, I will explain what it took to get there.
Let’s use style sheets for THREE.js elements, please!
The vast majority of THREE.js tutorials contain boilerplate code that assumes the WebGL content will be stretched across the entire window. These examples do not work at all when you try to position the WebGL canvas relative to other elements on the page.
A better approach is to start with code that works in all cases and then use the style sheet to stretch your content fit the entire window (if that is what you want). Doing it right from the start makes it easier to change your mind later and makes your code more flexible.
With this is mind, I am presenting two examples of how to do exactly that.
Example 1: Full window THREE.js using CSS
The first example looks very much like your typical THREE.js program: it shows a WebGL canvas that spans the entire window. The only unusual thing is the pastel background and the white margin.

Let’s walk through the source code to see how it is done. First, I make the body tag to take up the entire window. Doing this requires a trick where I peg each side of the body to the corresponding side of the browser window:
body {
	position:   absolute;
	top:        0;
	left:       0;
	right:      0;
	bottom:     0;

	margin:     3em;
}
Second, I set a margin of 3em units to create the white border around the page (you could remove this line if you don’t want a border).
The body element is the parent of the canvas element; with CSS, it is easy to tell the canvas to use all the space available to it in the parent (which is the size of the window minus the margin):
canvas {
	width:      100%;
	height:     100%;
}
Later on (I have separated the positioning and formatting into two separate style sheets), I assign a background color to the page and the canvas:
html {
	background-color: white;
}

canvas {
	background-color: beige;
}
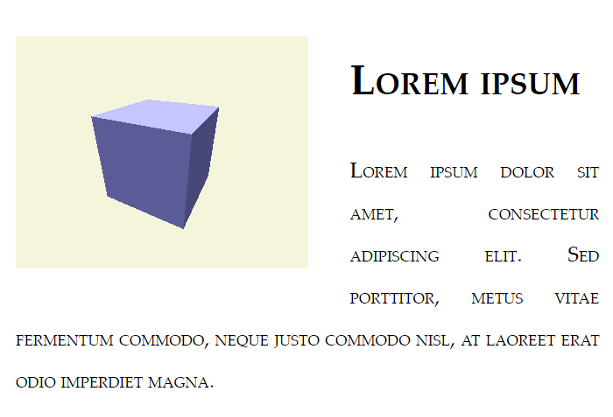
Example 2a: Flowing text around WebGL content
The second example shows text flowing dynamically around WebGL content. This example shows the true power of combining generically written THREE.js code with style sheets.
To do this, I make a change to the style sheet to size and position the canvas element:
canvas {
	float:         left;
	width:         50%;
	height:        50%;
	margin-right:  2em;
	margin-bottom: 1em;
}
I set the canvas to be half the width and height of the parent and I tell it to float to the left of the surrounding text; the right and bottom margin control the space between the WebGL content and the text around it.
Provided the JavaScript is written correctly (as I will discuss below), going from one layout to another requires only a small change to the style sheet, as the following example shows.
Example 2b: Interactive Zoom! You can have it both ways!
We can take things one step forward. Since the layout is now controlled directly by the style sheet, it only takes a couple extra CSS rules and a bit of JavaScript to give the user the ability to zoom in on the WebGL content:
	canvas.fullscreen {
		position:      fixed;
		top:           0;
		left:          0;
		width:         100%;
		height:        100%;
	}

	canvas:hover {
		cursor:        zoom-in;
	}

	canvas.fullscreen:hover {
		cursor:        zoom-out;
	}
The JavaScript code to toggle the state is equally trivial and could be made even easier if you were using JQuery:
	function toggleFullscreen() {
		var canvas = document.getElementById("webgl");
		if(canvas.className == "fullscreen") {
			canvas.removeAttribute("class");
		} else {
			canvas.setAttribute("class", "fullscreen");
		}

		onWindowResize();
	}
For simplicity, toggleFullscreen assumes there is just one class, this code will need adjustments if there are additional classes used on the canvas. The call to onWindowResize is necessary to adjust the parameters on the renderer.
What makes it work?
Making these examples work requires some changes to the typical THREE.js setup code. Look at the improved JavaScript code to see these changes.
One key insight came from rioki: rather than using the window’s width and height, I use clientWidth and clientHeight; these are the exact dimension of the canvas element as rendered on the screen, after all CSS rules are applied.
	var canvas = document.getElementById("webgl");
	camera = new THREE.PerspectiveCamera( 70, canvas.clientWidth / canvas.clientHeight, 1, 1000);
I also tell the renderer the specific canvas I want to use rather than letting it create a new one for me:
renderer = new THREE.WebGLRenderer({alpha: true, canvas: canvas});
canvas.width  = canvas.clientWidth;
canvas.height = canvas.clientHeight;
renderer.setViewport(0, 0, canvas.clientWidth, canvas.clientHeight);
Setting the alpha to true allows me to set the background color of the canvas element from the style sheet; setting the canvas height and width to the clientWidth and clientHeight allows the resolution of the canvas to match the size of the canvas as it appears on the screen—these same values are passed on to the THREE.js renderer object.
The “onResize” handler updates everything when the browser window is resized, based on the new clientWidth and clientHeight values of the canvas:
function onWindowResize() {
	var canvas = document.getElementById('webgl');
	canvas.width  = canvas.clientWidth;
	canvas.height = canvas.clientHeight;
	renderer.setViewport(0, 0, canvas.clientWidth, canvas.clientHeight);
	camera.aspect = canvas.clientWidth / canvas.clientHeight;
	camera.updateProjectionMatrix();
	render();
}
Using THREE.JS to render to SVG
I came across a blog post that demonstrates using THREE.js to create SVG images. Since that demo was done in CoffeeScript, it took me a while to understand it and build an equivalent JavaScript demo (and the source code).
The SVGRenderer is undocumented in the THREE.js website and it requires a few extra files that are not a part of the standard THREE.js distribution. This post will help you pull the necessary parts together.
My demo is loosly based on this great THREE.js tutorial. I modified it to show the WebGL output on the left-hand side and the SVG capture on the right-hand side. Clicking the arrow updates the SVG capture and shows the code for the SVG on the bottom of the page.
When you hover your mouse cursor over the right-hand side, the paths of the SVG will highlight in red. These correspond to triangles in the original THREE.js model.

The nice thing about rendering THREE.js models as SVG is that the visible faces will become path elements in the DOM, allowing you to highlight them with a single style sheet rule:
path:hover {
   stroke:       red;
   stroke-width: 2px;
}
This rule tells the web browser to stroke all path elements in a solid red line whenever the user hovers the mouse cursor over them.
How it works:
The demo uses the undocumented SVGRenderer object from THREE.js. The SVGRenderer object depends on another object called Projector. Neither are part of the official THREE.js build, so I grabbed the two source files from the “examples/js/renderer” directory of the THREE.js distribution from GitHub and placed them in my “lib” directory.
When the user clicks the arrow, the SVG on the right side is updated using a new instance of the SVGRenderer object. Here is what the code looks like:
var svgRenderer = new THREE.SVGRenderer();
svgRenderer.setClearColor(0xffffff);
svgRenderer.setSize(width,height);
svgRenderer.setQuality('high');
svgRenderer.render(scene,camera);
The SVGRenderer will store the SVG data in the domElement attribute of itself. In the following code fragment, I insert it into a parent DIV and remove the width and height attributes from the svg element so that I can scale it with style sheet rules.
svgContainer.appendChild(svgRenderer.domElement);
svgRenderer.domElement.removeAttribute('width');
svgRenderer.domElement.removeAttribute('height');
The SVG source for the bottom panel comes from the svgContainer.innerHTML attribute (domElement.outerHTML would work too). I use a regular expression to break up the source into lines and then post it into the destination text field:
document.getElementById('source').value = svgContainer.innerHTML.replace(/<path/g, "\n<path");
Could textures be used in 3D Printing?
Real world objects have surface texture. In computer graphics, real world materials are simulated by combining bitmapped textures with facet information. Bump maps or displacement maps add fine details to a surface without increasing the polygon count.
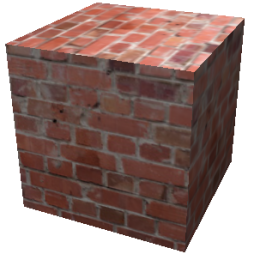
3D printing software today does not use textures at all: a model of brick wall, for example, requires many very small polygons to capture details.
One reason is that 3D slicers use STL files which cannot carry texture information. There are several other formats that do, however, so using another file format such as OBJ would solve this problem. A second reason may be that 3D printing happens layer by layer, making it difficult to perform a displacement for all surface orientations.
For vertical surfaces, it would be easy: the slicer would use texture values to displace the print head laterally, perpendicular to the wall contours. For horizontal surfaces, however, the displacement would be above or below the current layer, which would complicate things.
In future posts, I’ll continue to explore the possibility of using textures in 3D printing and will present some work I am doing towards that end.
